In this post, we are going to create our blog using Django. Firstly, Python and Django must be installed on the computer. You can download it from Django official website, also you can learn how to install it on your computer.
I will use Windows operating system when I will make this application. So let's create our project at first:
C:\Users\0xcoder\Desktop>django-admin startproject mysiteC:\Users\0xcoder\Desktop>C:\Users\0xcoder\Desktop>cd mysite
C:\Users\0xcoder\Desktop\mysite>dir
Volume in drive C has no label.
Volume Serial Number is 3C09-3D8E
Directory of C:\Users\0xcoder\Desktop\mysite
08/21/2021 01:26 PM <DIR> .
08/21/2021 01:26 PM <DIR> ..
08/21/2021 01:26 PM 684 manage.py
08/21/2021 01:26 PM <DIR> mysite
1 File(s) 684 bytes
3 Dir(s) 88,329,146,368 bytes freeC:\Users\0xcoder\Desktop\mysite> python manage.py runserverThere are some important information we need to know about Django:
- The software design pattern of Django is MVT (Model - View - Template). Model is a structure representing the table. View is the part that creates the logical structure. The structure that provides the relationship between the model and the template. Template is a static file like html file.
- Django has ORM Architecture (Object-Relational Mapping). This is about Models in Django. We don't need to type database tables with SQL. We can just use Python to create class as a model that will be a table on the database.
So, we want to make a blog. Therefore, we need to model called Post. This post is a model but it's actually a table on the database. But firstly we have to create an application called myblog:
C:\Users\0xcoder\Desktop\mysite> django-admin startapp myblogI'm going to use Visual Studio Code as code editor. I will open this project like this:
C:\Users\0xcoder\Desktop\mysite> code .from django.db import models
from django.contrib.auth.models import User
# Create your models here.
class Category(models.Model):
name = models.CharField(max_length=100, unique=True)
def __str__(self):
return self.name
class Post(models.Model):
title = models.CharField(max_length=400)
content = models.TextField()
pub_date = models.DateTimeField(auto_now_add=True)
categories = models.ManyToManyField(Category)
author = models.ForeignKey(User, on_delete=models.CASCADE)INSTALLED_APPS = [
'django.contrib.admin',
'django.contrib.auth',
'django.contrib.contenttypes',
'django.contrib.sessions',
'django.contrib.messages',
'django.contrib.staticfiles',
'myblog.apps.MyblogConfig',
]C:\Users\0xcoder\Desktop\mysite>python manage.py makemigrations
Migrations for 'myblog':
myblog\migrations\0001_initial.py
- Create model Category
- Create model PostC:\Users\0xcoder\Desktop\mysite>python manage.py migrate
Operations to perform:
Apply all migrations: admin, auth, contenttypes, myblog, sessions
Running migrations:
Applying contenttypes.0001_initial... OK
Applying auth.0001_initial... OK
Applying admin.0001_initial... OK
Applying admin.0002_logentry_remove_auto_add... OK
Applying admin.0003_logentry_add_action_flag_choices... OK
Applying contenttypes.0002_remove_content_type_name... OK
Applying auth.0002_alter_permission_name_max_length... OK
Applying auth.0003_alter_user_email_max_length... OK
Applying auth.0004_alter_user_username_opts... OK
Applying auth.0005_alter_user_last_login_null... OK
Applying auth.0006_require_contenttypes_0002... OK
Applying auth.0007_alter_validators_add_error_messages... OK
Applying auth.0008_alter_user_username_max_length... OK
Applying auth.0009_alter_user_last_name_max_length... OK
Applying auth.0010_alter_group_name_max_length... OK
Applying auth.0011_update_proxy_permissions... OK
Applying auth.0012_alter_user_first_name_max_length... OK
Applying myblog.0001_initial... OK
Applying sessions.0001_initial... OKfrom django.contrib import admin
from .models import Category, Post
# Register your models here.
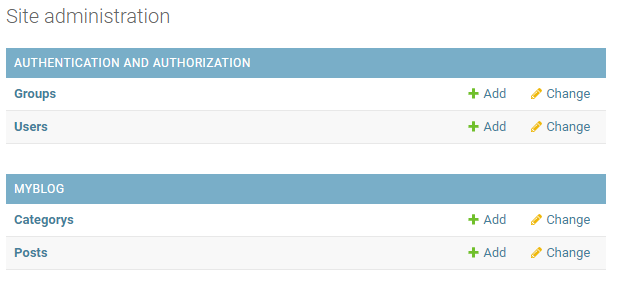
admin.site.register(Post)
admin.site.register(Category)C:\Users\0xcoder\Desktop\mysite>python manage.py createsuperuser
Username (leave blank to use '0xcoder'): 0xcoder
Email address:
Password:
Password (again):
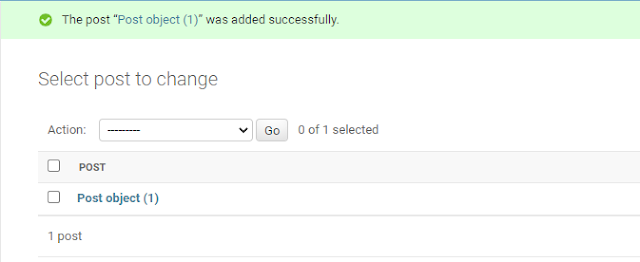
Superuser created successfully.I created a first post as example:
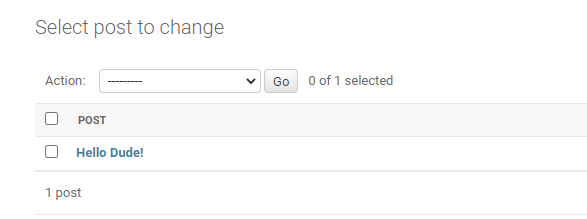
When you save it, you should see this output:This is normal. I already added this feature to Category model. Post title should be seen instead of "Post object (number)". To do this, lets open models.py and added __str__ function to the Post class like this:
class Post(models.Model):
    title = models.CharField(max_length=400)
    content = models.TextField()
    pub_date = models.DateTimeField(auto_now_add=True)
    categories = models.ManyToManyField(Category)
    author = models.ForeignKey(User, on_delete=models.CASCADE)

    def __str__(self):
return self.titleThat's a good progress. Let's create our first view with template. Firstly I created a folder called templates in the application.
Create a new file called index.html in this folder:
<!DOCTYPE html>
<html>
    <head>
        <title>My Blog</title>
    </head>
    <body>
        <h1>My Blog</h1>
    </body>
</html>from django.shortcuts import render
# Create your views here.
def index(request):
return render(request, 'index.html')from django.urls import path
from .views import index
urlpatterns = [
path('/', index),
]from django.contrib import admin
from django.urls import path, include
urlpatterns = [
path('admin/', admin.site.urls),
path('', include('myblog.urls')),
]- mysite +
- mysite +
- myblog +
- templates +
- db.sqlite3
- manage.py
After this operation, we have to specify this templates folder in settings.py. Open the settings.py:
TEMPLATES = [
{
'BACKEND': 'django.template.backends.django.DjangoTemplates',
'DIRS': [os.path.join(BASE_DIR, 'templates')],
'APP_DIRS': True,
'OPTIONS': {
'context_processors': [
'django.template.context_processors.debug',
'django.template.context_processors.request',
'django.contrib.auth.context_processors.auth',
'django.contrib.messages.context_processors.messages',
],
},
},
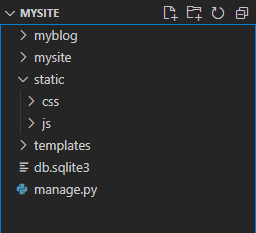
]Also, we need to use CSS and JS files in our website. These files are static files. Therefore, we need to create folder called static in mysite directory:
- mysite +
- mysite +
- myblog +
- static +
- templates +
- db.sqlite3
- manage.py
Now, we need to specify this folder in settings.py as static. Open the settings.py file and type this code:
STATICFILES_DIRS = [os.path.join(BASE_DIR, 'static'), ]Now, we can use our static files in html file:
{% load static %}
<!DOCTYPE html>
<html>
<head>
<title>My Blog</title>
<meta charset="utf-8">
<meta name="viewport" content="width=device-width, initial-scale=1">
<link rel="stylesheet" href="{% static 'css/bootstrap.min.css' %}">
<script src="{% static 'js/jquery.min.js' %}"></script>
<script src="{% static 'js/bootstrap.min.js'%}"></script>
</head>
<body>
<div class="container">
<h1>My Blog</h1>
<p>This is a test.</p>
</div>
</body>
</html>{% load static %}
<!DOCTYPE html>
<html>
<head>
<title>My Blog</title>
<meta charset="utf-8">
<meta name="viewport" content="width=device-width, initial-scale=1">
<link rel="stylesheet" href="{% static 'styles.css' %}">
<link rel="stylesheet" href="{% static 'css/bootstrap.min.css' %}">
<script src="{% static 'js/jquery.min.js' %}"></script>
<script src="{% static 'js/bootstrap.min.js'%}"></script>
</head>
<body>
<div class="container">
<header>
<div class="row">
<div class="col-sm-12">
<h1>My Blog</h1>
<p>This is a test.</p>
</div>
</div>
</header>
<!-- header end -->
{% block content %}
{% endblock %}
<!-- footer start -->
<footer>
<div class="row">
<div class="col-sm-12">Footer</div>
</div>
</footer>
</div>
</body>
</html>{% extends '_base_layout.html' %}
{% block content %}
<div class="row">
<div class="col-sm-9">Content</div>
<div class="col-sm-3">Sidebar</div>
</div>
{% endblock %}<nav class="navbar navbar-expand-sm bg-light">
<!-- Links -->
<ul class="navbar-nav">
<li class="nav-item">
<a class="nav-link" href="#">Link 1</a>
</li>
<li class="nav-item">
<a class="nav-link" href="#">Link 2</a>
</li>
<li class="nav-item">
<a class="nav-link" href="#">Link 3</a>
</li>
</ul>
</nav>{% load static %}
<!DOCTYPE html>
<html>
<head>
<title>My Blog</title>
<meta charset="utf-8">
<meta name="viewport" content="width=device-width, initial-scale=1">
<link rel="stylesheet" href="{% static 'styles.css' %}">
<link rel="stylesheet" href="{% static 'css/bootstrap.min.css' %}">
<script src="{% static 'js/jquery.min.js' %}"></script>
<script src="{% static 'js/bootstrap.min.js'%}"></script>
</head>
<body>
<div class="container">
<header>
<div class="row">
<div class="col-sm-12">
<h1>My Blog</h1>
<p>This is a test.</p>
</div>
</div>
</header>
<!-- header end -->
{% include '_navbar.html' %}
{% block content %}
{% endblock %}
<!-- footer start -->
<footer>
<div class="row">
<div class="col-sm-12">Footer</div>
</div>
</footer>
</div>
</body>
</html>I want to add "about page" on my blog. I opened views.py in the application and I created a new view for about page:
from django.shortcuts import render

# Create your views here.
def index(request):
    return render(request, 'index.html')
def about(request):
return render(request, 'about.html')from django.urls import path
from .views import *
urlpatterns = [
path('', index),
path('about', about, name="about"),
]{% extends '_base_layout.html' %}
{% block content %}
<div class="row">
<div class="col-sm-12">
<h1>About</h1>
</div>
</div>
{% endblock %}<nav class="navbar navbar-expand-sm bg-light">
<!-- Links -->
<ul class="navbar-nav">
<li class="nav-item">
<a class="nav-link" href="{% url 'index' %}">Home</a>
</li>
<li class="nav-item">
<a class="nav-link" href="{% url 'about' %}">About</a>
</li>
<li class="nav-item">
<a class="nav-link" href="#">Link 2</a>
</li>
<li class="nav-item">
<a class="nav-link" href="#">Link 3</a>
</li>
</ul>
</nav>from django.shortcuts import render
from .models import Post
# Create your views here.
def index(request):
# get all posts from database
posts = Post.objects.all()
context = {
'posts': posts,
}
return render(request, 'index.html', context)
def about(request):
return render(request, 'about.html'){% extends '_base_layout.html' %}
{% block content %}
<div class="row">
<div class="col-sm-9">
{% for post in posts %}
<div class="card">
<div class="card-body">
<h5 class="card-title"> {{ post.title }} </h5>
<p class="card-text"> {{ post.content }} </p>
<a href="#" class="btn btn-primary">Read more..</a>
</div>
</div>
{% endfor %}
</div>
<div class="col-sm-3">Sidebar</div>
</div>
{% endblock %}
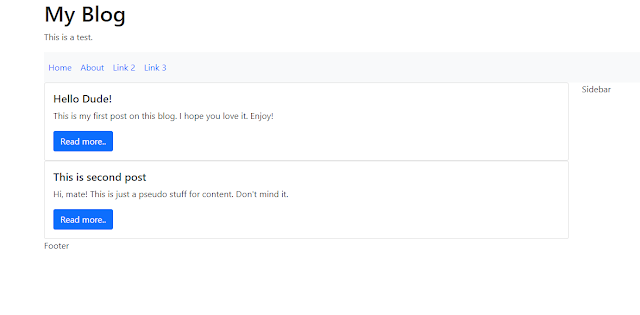
Let's add some posts on the admin panel and let's look at the again:
That's okay but there is a problem ordering. The last post should be top on the older posts. Open the models.py in the application folder and add this meta setting to solve this problem:
class Post(models.Model):
    title = models.CharField(max_length=400)
    content = models.TextField()
    pub_date = models.DateTimeField(auto_now_add=True)
    categories = models.ManyToManyField(Category)
    author = models.ForeignKey(User, on_delete=models.CASCADE)

    def __str__(self):
        return self.title

    class Meta:
ordering = ['-pub_date',]def detail(request, pk):
post = Post.objects.get(pk=pk)
context = {
'post' : post,
}
return render(request, 'detail.html', context)urlpatterns = [
path('', index, name="index"),
path('about', about, name="about"),
path('post/<int:pk>', detail, name="detail"),
]{% extends '_base_layout.html' %}
{% block content %}
<div class="row">
<div class="col-sm-9">
<h1>{{ post.title }}</h1>
<p>{{ post.content }}</p>
</div>
<div class="col-sm-3">
sidebar
</div>
</div>
{% endblock %}{% extends '_base_layout.html' %}
{% block content %}
<div class="row">
<div class="col-sm-9">
{% for post in posts %}
<div class="card">
<div class="card-body">
<h5 class="card-title">
<a href="{% url 'detail' pk=post.pk %}">{{ post.title }}</a>
</h5>
<p class="card-text"> {{ post.content }} </p>
<a href="#" class="btn btn-primary">Read more..</a>
</div>
</div>
{% endfor %}
</div>
<div class="col-sm-3">Sidebar</div>
</div>
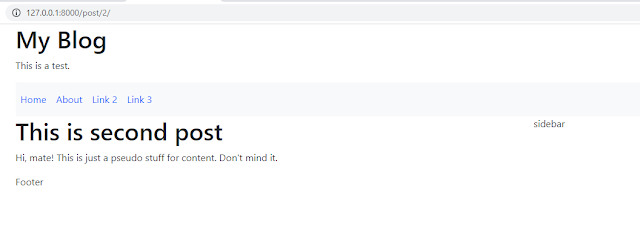
{% endblock %}Finally, we made this. I think this is enough as I beginner. I learnt too much things when I type this blog post. I hope it will help you. I will keep going learn and share my experience on this blog. I will develop this project as much as I can.






No comments:
Post a Comment